Showing posts with label designing a shared room. Show all posts

Sunday, December 2, 2012

Designing a shared room: Picture frame bow holder

I thought it was funny that my last post about their room, was the same day Eliana arrived. If you missed reading that post you can read it here.

I decided, after jumping on the "bow" bandwagon, that Eliana needed a bow holder. Once again, Pinterest came to the rescue. I used this tutorial to make the picture frame bow holder.

Picture frame DIY cost: 

Frame: $2.50 (thrifted)
Chevron fabric: $2.00 (SAS fabrics wholesale)
Grey polka dot ribbon(4 yards):  $1.00 (SAS fabrics wholesale)
Hooks: $1.00 (Walmart)

Total: $6.50!!! 

Total time: 1 hour

Photobucket
Has to be the ugliest picture I've ever seen, but the frame is big and sturdy. I love these vintage frames too.
 
Photobucket
I liked the distressed look the frame already had, so I sprayed a light coat of creme paint so it would match the shelve it would be hanging by.


Photobucket
This project was one of the quickest and easiest projects to do, but I love how it looks. I've seen holders like this in boutique shops selling for over $50 too!


Photobucket

Thursday, October 11, 2012

Designing a shared room: It's finished!

Well, I'm happy to announce that Parker and Eliana's room is pretty much finished. I have a couple other pictures to hang on the walls(Eliana and Parker's newborn photo's), and we are still deciding on the curtains for the other 2 windows, but other than that it's done!

With being in the hospital for so long and on bed rest at home prior to that, I didn't think it would ever get completed. I've been busy since I've been home and made the last push to get the final touches in place.

If you want to read the other posts related to this project, I will link them here.

Inspiration post

Painting the room

Photobucket

The view as you look in from the bedroom door. The bunting/flags are made from felt. I actually used these for Parker's birthday party as well. The cradle I thrifted for $10. I'm so excited to use it to take some newborn pictures.

Photobucket

A peek inside Parker's tent bed. We added a little hook at the top to tie the Hungry Caterpillar mobile. Everything to make this tent, except the Hungry Caterpillar fabric, I bought from a thrift store. The tent is made from 2 queen sheets, the doors are made from a sheer curtain. The pillow that Parker lays on was also made from heavy duty velvet curtains and the stuffing was made from tons and tons of scrap minky fabric I had been keeping. I spent a total of $20 in materials to make the tent bed.  

Photobucket

The curtains were cheap curtains I purchased from Walmart, and I added a border of Hungry Caterpillar fabric to the bottom and made also made some matching curtain ties.

Photobucket

The shelf was also thrifted for a couple dollars. I spray painted the shelf and because the other hooks that were on the shelf were broken, I removed them and put on some hooks I already had from Parker's room. 

Photobucket

We will be adding some curtains to this window as soon as I can pick them up. The newborn photos will be hung on the empty wall on the left.

Photobucket

The mobile was made using the tutorial found here.
I made a few changes to the design. Instead of wrapping the embroidery hoop with twine, I used some sticky ribbon that I had from scrap booking. I also used some vintage lace ribbon to hang each piece, that I found at the thrift store instead of using the twine.

Photobucket

The crib bedding is from Pottery Barn, which I bought at a consignment shop. Since I was purging a lot of Parker's toys and clothes he'd outgrown, I didn't pay any cash for the entire bedding set.

Photobucket

All the frames on this wall were thrifted. The letters I bought from Michaels and just spray painted them. I have a couple more pictures to add to this collage wall, but I haven't found any frames at the thrift store that I like yet. 

Photobucket

Here is a before and after picture of the room taken from roughly the same angle.

And that is it! Thanks to so many inspirational ideas from Pinterest, I think the room turned out amazing. Could not have done it without Pinterest.

Now, the waiting game begins for Eliana's arrival.


Friday, July 20, 2012

Designing a shared room: Painting chevron stripes

It feels good to say that we got all the painting finished in the room that Parker and Eliana will be sharing. It's a little ironic because I don't paint, but I wanted to do something special for this room. Now we may not even be staying in this house for as long as we had initially planned and will more than likely be re-painting in a few months.


Photobucket

It's hard to see the grid in this picture, but it's there. 

Just a note: We used the white that the wall already was painted as the second stripe color. This allowed for a lot less time and money spent on this project. From what I've read, if you are doing two different colors, it's recommended to paint the whole wall one color. After that has dried, then you will do the grid step.

After researching quite a few tutorials on how to have the "chevron stripe" look in the room. Most of the tutorials included a lot of measuring, calculating distances, angles and more measuring. I'm pregnant, my brain is not functioning at 100% at the moment.

Tools we used to draw grid:

Spiderman #2 pencil..(lol!)
12"x12" thick card stock paper (x2)...usually in the scrapbook section of craft stores.

Make sure if you use this method you write "TOP" on one side and on one of the pieces of the card stock. We found that they aren't perfect squares and if you don't place the card stock the same direction each time, it will result in the grid not lining up. 

The second piece of card stock paper you will fold in half, diagonally. This piece is what you will use to draw the diagonal lines for the stripes. 


Photobucket


We did write "new paint area" in all the sections that would be painted. Again, pregnant brain...I knew that I would mess something up if I didn't mark it.


Photobucket

 And here is the finished wall. Amazing the character the room receives with just a little paint.  I LOVE it!!

Paint color: Fudge Truffle from Olympic (Lowe's)

We used less than a quart of paint to do this project and we had to paint 3-4 coats. We still have 1/4 of the can left over.

With the painter's tape, roller, pan and paint we spent less than $20 on this project.

And just for fun, some pictures I took this morning.


Photobucket


Thursday, July 5, 2012

Designing a shared baby/toddler room

Ever since I found out I was pregnant with a girl, I was so excited to start a little nursery for her. I'm not big on the traditional pinks and purples and I have to keep in mind that she is sharing a room with her big brother so I will keep the ruffles to a minimum.

We had recently started to decorate Parker's room in "The Very Hungry Caterpillar" theme, but I didn't want that theme for the baby's side. Thanks to Pinterest I have found so many ideas that I would love to incorporate into the room they will be sharing.

We did pick up the nursery bedding last weekend. We kept the bedding fairly neutral, to make coordinating a bit easier. Not to mention I have always LOVED the lamb bedding from Pottery Barn. I decided not to buy the mobile. I'm not a fan of that and hope to be able to find some whimsical I can make to match the set.


I'm dead set on doing chevron stripes on one wall in the room. It will be more of a light brown than pink. I think they are so cute!


I will definitely be doing a picture/sayings collage wall in the room. I'm so bad at putting up pictures in the house and this will be a must do project for the room. If you see the cute flag/bunting banner in the lower left picture, I would also love to do that in the room as well.


Photobucket


We have 3 windows in the room and we just purchased curtains for two of the windows and so for the third window, where the crib will be, I'm going to be making some ruffled curtains. I hope to have enough time to do full ruffles the length of the curtain, but if that doesn't happen I will do a few rows of ruffles along the bottom border.


Photobucket


We decided to forgo the toddler bed with Parker and instead I'm making him a hanging "tent" bed. Here is the basic pattern I will be using. I will be making the main portion solid white or creme and the top a brown to match the crib set and then will be adding Hungry Caterpillar applique' accents all around and making a couple Hungry Caterpillar pillows. I'm still researching the mattress. I was thinking at first to buy a rounded crib mattress as it would fit pretty good, but it's still up in the air.

Aww, I would have LOVED to have this when I was a kid. How cool would it have been to sleep in an awesome tent like this! Maybe it's just me...


Photobucket


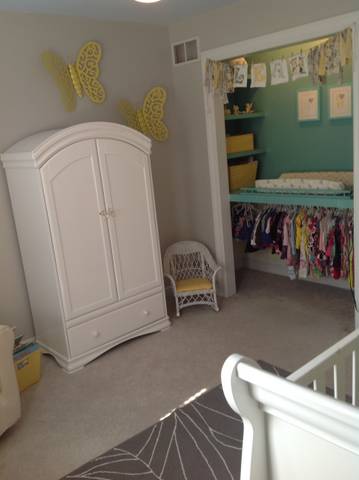
The closet in the room is small and seems nonfunctional except for hanging clothes and hiding toys. I'm debating painting the closet a light coordinating color like they did in this nursery.


Now, just to get to work! I'm so excited about the project, yet I know it will be a lot of work.


Related Posts Plugin for WordPress, Blogger...